Overview
Client Messages provides secure communication between agency users and Client Access users. Messages can be sent directly to a client or associated with an account, allowing conversations and related attachments to remain available in ACE.
Client Messages is available with the Client Access PLUS add-on.
Access Client Messages
Agency users can access Client Messages from several locations in ACE.
View All Client Messages
Go to Clients → Messages to view Client Messages across the clients you have access to.
View Messages for a Client
Go to Clients → Profiles.
Select a client.
Select Client Messages from the sidebar.
The message list is filtered to the selected client.
View Messages for an Account
Open an account and select Client Messages from the sidebar.
The message list is filtered to the selected account.
Client Access users can access messages from Clients → Messages or Communication → Messages and can only view messages for clients they are authorized to access.
Use the Mailbox
Select a folder to choose which messages to view, then use the quick filters or search field to narrow the list.

Image Displays All Client Messages
Folder | Displays |
|---|---|
Inbox | Messages received from the other side. Agency users see client messages; Client Access users see agency messages. |
Starred | Messages marked with a star. |
Sent | Messages sent to the other side. |
Archive | Archived messages, when archiving is available to your user. |
Filter Messages

Image Displays Mailbox Folders, Search, and Quick Filters
Quick Filter | Displays |
|---|---|
All | All messages in the selected view. |
New | Unread messages. |
Needs Reply | Unread messages that are not marked important. |
Needs Attention | Unread messages marked important. |
Use the search field to find messages by account, client, or text. For example:
debt:110204226filters by Debt ID.client:SAMPLE1filters by customer client code. You can also use the client ID.Enter a word or phrase to search message text.
You can use an equals sign instead of a colon in account and client filters. Click the X in the search field to clear the filter.
Send a New Message
Open Client Messages and click Compose.
Enter a Subject.
Enter the message text. Use the editor controls to apply formatting or add a list.
For an account-specific message, enter or verify In regards to account. ACE looks up the account's client automatically. If you opened Client Messages from an account, this field is already populated.
For a message without an account, select the applicable client. Client Access users may see On Behalf of Client when they have access to more than one client.
Add attachments, if needed.
Click Send.
A subject, message body, and client association are required. An account association is optional. If you enter an account, ACE validates it before sending and selects its client automatically.
Please Note: Client Messages does not save drafts. Closing the compose window discards the unsent message.
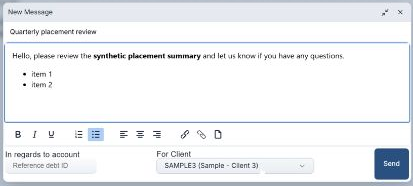
Image Displays the New Message Window
Add and Download Attachments
Attach a File From Your Computer
In the compose or reply window, click Attach file.
Select the files from your computer.
Review the attachment list and remove any files you do not want to send.
Click Send when the message is ready.
Attach an Existing Account Document
Associate the message with the applicable account.
Click Attach account document.
Select the account documents to include.
Click Attach, then send the message.

Image Displays Account Document Selection and the Attach Button
Attachments follow ACE document validation rules, including restrictions on unsafe file extensions and filenames. Files inside a ZIP are subject to the same restrictions.
Download an Attachment
Click the attachment name below a message to download the file.
Read and Reply to a Message
Select a message to open its conversation thread. Opening a message marks it as read.
Review the message and any replies. Click a long message to expand or collapse it.
Click Reply.
Enter your response and add attachments as needed.
Review the account association. If the message already has an associated account, the account field is disabled.
Click Send. The reply is added to the conversation thread.

Image Displays a Message Conversation, Attachment, and Reply Button
Replies inherit the original subject. Use the back arrow, select a mailbox folder, or use your browser's Back button to return to the message list.
Manage Messages
Star or unstar: Click the star beside a message. A filled star indicates a starred message.
Mark read or unread: Hover over a message and select the read/unread action. Unread messages have a shaded background.
Archive: Hover over a message and select the archive action.
Restore: Open Archive, hover over the message, and select the restore action. It returns to its original mailbox folder.
Delete: Hover over a message and select the delete action.
Archive and delete actions appear only when your agency permissions or Client Access template settings allow them.
For administrator setup, see Configuring Client Access PLUS Messages.