
Overview
Client Tasks helps agency and Client Access users track account requests. Before users can access Client Tasks, configure permissions, Task Types, and Client Access settings. You can also automate task creation and notifications.
Please Note:
Client Tasks is available with the Client Access PLUS add-on. To add Client Access PLUS to your ACE system, contact sales@interprose.com.
Configure User Permissions
Assign agency administrators the Manage - Debt Tasks role or equivalent permissions. This role includes all eight permissions below. Give participating users the permissions needed for their work and access to the appropriate clients and accounts.
Permission | Description |
|---|---|
| View tasks. |
| Create tasks. |
| Update tasks, including status. |
| Delete tasks. |
| View Task Types. |
| Create Task Types. |
| Update Task Types. |
| Delete Task Types. |
Create any additional roles needed for task creators and participating teams. Task Type roles and client/account access apply in addition to these permissions.
Configure Task Types
Navigate to Clients → Tasks.
Open a task or click New.
Select Manage beside Task Type.
Create a Task Type or open an existing type.
Complete the fields below, then click Save.
Field | Description |
|---|---|
Label | A descriptive task type name displayed to users. |
Identifier | A stable identifier for the task type. |
Create Role | Only users with this role can create tasks of this type. |
View Role | Only users with this role can view tasks of this type. Include everyone who needs to participate, on the agency or client side. |
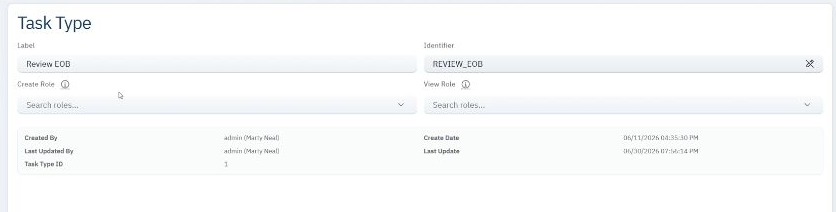
Image Displays Label, Identifier, Create Role, and View Role
Please Note: Leaving Create Role or View Role blank removes that additional Task Type restriction. Users still need the applicable task permissions and client/account access. Blank roles do not make tasks public or grant access to other clients’ accounts.
Task Type roles control access. They do not select an individual assignee or send notifications. Configure workflow actions separately for notifications.
Enable Client Tasks for Client Access Users
Navigate to Setup → User Interface → Client Access.
Open the applicable Client Access template.
Enable Show Client Tasks.
Click Apply.

Image Displays the Show Client Tasks Setting
Configure Task Notes
Task creation and deletion generate Account notes identifying the Task Type and Task ID. Updates do not generate these notes.
Open the applicable template under Setup → User Interface → Client Access.
Enable Show Notes.
Under Notes → Types, include Account.
Click Apply.
Configure Workflows
Use task triggers to run configured actions when a task is created or becomes due. Notifications are configured separately from Task Type roles.
Event Type | Description |
|---|---|
onAfterClientTaskFromAgencyInsert | An agency user creates a task. |
onAfterClientTaskFromClientInsert | A Client Access user creates a task. |
onClientTaskDue | The Launch Date Triggers job processes a task that is due. |
Configure the Action Path or flow action under Setup → Workflow → Action Paths.
Navigate to Setup → Workflow → Triggers and create a new trigger.
Search for task in Event Type and select the event.
Enter a description and enable Active.
Select the Flow Action ID for the configured action.
Click Apply.

Image Displays the Task Event Types in the Trigger Configuration
Examples include emailing the client when an agency creates a task, alerting the account’s primary agent when a client creates a task, or notifying an administrator when a task becomes due.
Task trigger context includes debt, client, debtTask, and link. The walkthrough also demonstrates clientEmails for client notification recipients. Verify recipient selection and template values when testing your action.
Please Note: Due-date actions depend on the Launch Date Triggers job. Review its schedule under Utilities → Jobs and test your configuration. A due date alone does not send a notification.
Create Tasks Through Workflow
Use the Create Debt Task flow action to create an Open task for the account.
Open or create an Action Path under Setup → Workflow → Action Paths.
Add a flow action using Create Debt Task.
Complete the action fields below.
Save the action and Action Path, then connect the Action Path to the intended workflow event.
Test the workflow on an appropriate test account.
Field | Description |
|---|---|
Task Type | Required. Select a configured Task Type. |
Task Source | Required. Select Agency or Client. Defaults to Agency. |
Description | Optional. Supports account template expressions, such as ${client.customerClientCode}. |
Due in Days | Optional. Calculates a due date relative to the day the action runs. |
Automated creation can choose either source. Select the source that places the task in the intended receiving side’s default queue.
Verify the Configuration
Test with representative agency and Client Access users. Confirm that each can access the intended clients/accounts and can create, view, and update the appropriate task types.
Agency users access Clients → Tasks. Client Access users access Communication → Tasks. Each side’s default list shows non-closed tasks from the opposite side.
Test Notifications
Create one task from each side and confirm the intended email or alert is generated. Check email results under Utilities → Email Search and user alerts in Alerts. Confirm that any task link opens the intended task for an authorized user.
For a due-date workflow, test a task with a due date and confirm the result after the configured Launch Date Triggers job runs.
API Access
Task and Task Type APIs are included in the ACE API documentation under /api/debtTask and /api/debtTask/type. For authentication, operations, and request details, see Help → API Documentation.